
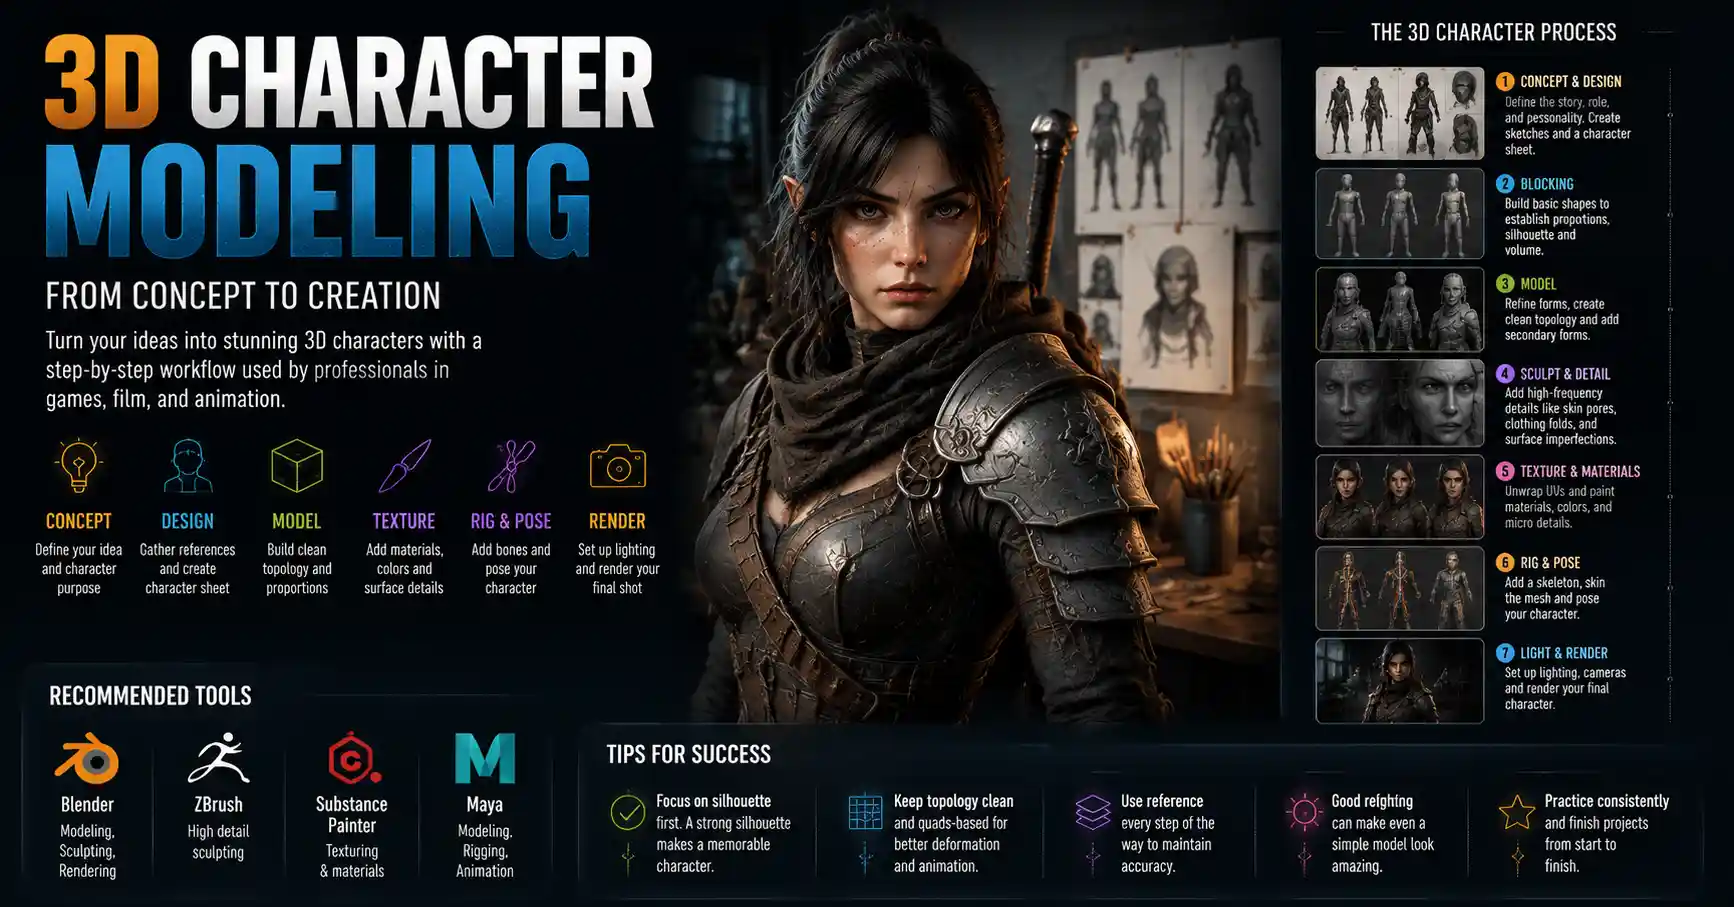
Whether you’re creating assets for a video game, animating a short film, or designing a collectible figure, 3D character modeling is equal parts technical skill and creative storytelling. A well-made 3D character doesn’t just look good on a screen—it feels alive, with proportions, details, and personality that connect with audiences. For beginners, the process can feel overwhelming: between choosing software, mastering topology, and adding textures, it’s easy to get stuck before you even finish your first model. This step-by-step guide breaks down the entire workflow into manageable, actionable stages, so you can go from a rough concept to a polished, production-ready 3D character.
Pre-Production: Planning Your Character Before You Model
Many new artists jump straight into 3D software without a clear plan, only to waste hours reworking proportions or fixing design inconsistencies. Pre-production lays the foundation for a smooth modeling process and ensures your final character matches your original vision. This stage doesn’t require any 3D skills—it’s all about refining your idea and gathering reference material.
Gather High-Quality Reference Material
Reference is non-negotiable, even for experienced character artists. Even if you’re designing an entirely original fantasy creature, real-world anatomy and existing design references will help you avoid unrealistic proportions and add believability to your work. What kind of references do you need? At a minimum, you’ll need front and side orthographic (straight-on) views of your character to use as a guide in your 3D software. If you’re creating a human character, photos of real people from multiple angles will help you capture subtle details like muscle definition, facial structure, and skin folds. For stylized or non-human characters, collect references for textures (like dragon scales or furry alien fur), body shapes, and design details from existing art, nature, or architecture.
“Good references don’t constrain your creativity—they free it. When you don’t have to guess what a elbow actually looks like in a certain pose, you can focus on making your character feel unique instead of fixing basic anatomy mistakes.”
Organize your references in a free tool like PureRef or Google Photos so you can keep them open alongside your 3D software while you work. This saves you from wasting time searching for images mid-modeling session.
Define Your Character’s Purpose and Style
Before you start modeling, clarify what your character will be used for, because this changes every step of the process. A character for a mobile indie game needs far fewer polygons than a character for a AAA cinematic cutscene, for example. A collectible 3D print only needs to look good from specific viewing angles, while a game character needs to deform correctly when animated. Ask yourself these key questions:
- Is this character realistic or stylized? Stylized characters often require exaggerated proportions that follow different rules than realistic human anatomy.
- What is the polygon count limit? Low-poly models for games require efficient topology, while high-poly models for film can support millions of polygons for fine details.
- Will the character be animated? If yes, you’ll need to prioritize clean edge flow around joints to avoid weird deformations when the character moves.
Once you have your references and a clear purpose, you can sketch out basic front, side, and back views of your character to use as a template in your 3D software. This is called a character sheet, and it’s your roadmap for the entire modeling process.
Blocking Out Basic Shapes: Establishing Proportions First
Blocking is the first step of actual 3D modeling, and its only goal is to get the overall proportions and silhouette of your character right before you add any details. Many new artists make the mistake of adding fine details like fingernails or facial hair before they fix a wonky body proportion, which means they have to redo all that detailed work later. Blocking avoids that wasted effort by keeping the focus on big-picture form.
Choose the Right Modeling Approach
Your choice of 3D software depends on your budget, your goals, and your personal workflow. Popular options for beginners and professionals alike include:
- Blender: Free, open-source software with a huge community and full functionality for character modeling. It’s the most popular choice for beginners and independent artists today.
- ZBrush: The industry standard for sculpting high-poly details, especially for organic characters like humans and creatures.
- Maya: A professional-grade software used widely in game and film studios for modeling and rigging.
- Substance 3D Painter: Used for texturing, after you finish your base model.
For beginners, starting with Blender is almost always the best choice—it’s completely free, and there are thousands of free tutorials to help you learn the interface. Once you get comfortable with blocking, you can add ZBrush for detailed sculpting if you need it.
The Step-by-Step Blocking Workflow
Blocking works for any character, from a goblin to a realistic superhero. Follow this simple process to get solid proportions:
- Import your orthographic reference images into your 3D software, lining them up so the front and side views match. Most software lets you add these as background image planes that you can reference while you model.
- Start with primitive shapes: cubes, spheres, and cylinders to build the major body parts. For a human character, this means a rough sphere for the head, a stretched cube for the torso, and cylinders for the arms, legs, and neck. Don’t worry about smoothness or detail here—just get the relative sizes right.
- Adjust the position and size of each primitive to match your reference. Check the silhouette from every angle: a good character silhouette is instantly recognizable even without any details. If your character’s silhouette looks boring or off proportions, fix it now before moving on.
- Combine the primitives and refine the basic forms to connect them smoothly. For example, round out the connection between the neck and shoulders, and taper the cylinders of the arms to get the basic shape of the bicep and forearm.
Once you’re done blocking, step away from your screen for at least 30 minutes. When you come back, you’ll notice proportion mistakes you missed earlier. Flip your model horizontally to check for symmetry—most human characters are roughly symmetric, and flipping the view makes it easy to spot lopsided hips or uneven shoulders. Don’t move on to detailing until you’re completely happy with your basic proportions. This step can take as little as 30 minutes for a simple stylized character, or a few hours for a complex realistic character, and it’s the most important step in the entire process.
Refining Topology and Adding Detail
Once your blockout is final, it’s time to refine your model, add surface details, and clean up your geometry. This stage is where your character goes from a rough shape to a polished model that’s ready for texturing and rigging. The exact process depends on whether you’re using a box modeling workflow (building the model from a single primitive, refining it bit by bit) or a sculpting workflow (sculpting a high-poly model first, then creating a lower-poly version for production).
Understanding Topology and Edge Flow
If you’ve spent any time reading 3D modeling guides, you’ve heard the term topology. Topology refers to the arrangement of polygons (the small triangles or quads that make up your 3D model) on the surface of your character. Good topology makes your model smooth, easy to animate, and efficient to render. Bad topology can cause weird deformations when you animate, artifacts when you render, and problems when you add textures.
The most important rule of good topology for organic characters is clean edge flow. Edges (the lines between polygons) should follow the muscle and bone structure of the character, and loop around natural features like joints, eyes, and mouth. This is especially important if you plan to animate your character: when a character bends their arm, the edge loops around the elbow need to stretch and deform smoothly. If your edges are messy or arranged the wrong way, the elbow will crease weirdly or look lumpy when it bends.
Some basic rules for clean topology:
- Use as few polygons as possible to get the shape you want. Extra polygons don’t make your model better—they just slow down your software and make animation harder.
- Stick to quadrilaterals (four-sided polygons) whenever possible. Triangles are fine for small areas or hard-surface details, but quads deform much better for animation.
- Avoid poles (points where more than four edges meet) wherever possible, especially on areas that need to deform. If you do need a pole, place it somewhere flat and out of the way, like the side of the torso or the back of the head.
Adding High-Poly Details
Once your base topology is clean, you can add fine details like wrinkles, pores, scars, muscle definition, or clothing folds. For most modern workflows, artists do this by sculpting a high-poly model (with millions of polygons) in ZBrush or Blender’s sculpt mode, then baking the details down as a normal map that can be applied to a lower-poly base model. This gives you the visual detail of a high-poly model without the performance cost of millions of polygons for games or animation.
Common details you might add at this stage include:
- Facial details: laugh lines, pores, cheek definition, and the shape of the nose and lips
- Body details: muscle definition, stretch marks, freckles (added as texture later), and finger joint wrinkles
- Clothing and accessories: seams, buttons, fabric texture, and folds caused by the character’s posture
- Creative details: scars, tattoos (added in texturing), horns, scales, or other unique features that match your character’s backstory
If you’re new to sculpting, start small. Don’t try to add every possible detail on your first model. Focus on the big details first, like the shape of the jaw and the curve of the cheek, before moving on to smaller details like pores. It’s easy to go overboard with details that no one will ever notice, so keep your character’s purpose in mind: a character that’s always going to be 10 feet away from the camera in a game doesn’t need visible pores, for example.
UV Unwrapping and Texturing: Bringing Your Character to Life
A clean, well-modeled character is just a gray shape until you add textures. UV unwrapping and texturing are the stages where you add color, surface detail, and personality to your model. This is where your character really starts to feel like a finished creation.
What is UV Unwrapping, and Why Does It Matter?
A 3D model is a 3D shape, but textures are 2D images. UV unwrapping is the process of flattening your 3D model onto a 2D plane so you can map your 2D texture image onto the 3D surface. Think of it like unfolding a cardboard box to lay it flat: you’re cutting the 3D shape into pieces that lay flat, so you can print a design on it and then fold it back into 3D.
Bad UV unwrapping causes obvious problems: stretched textures where a brick wall looks blurry, or seams where two pieces of the UV map meet on the model. Good UV unwrapping is invisible—no one notices it, but it makes your textures look sharp and consistent across the entire character.
Key tips for clean UV unwrapping:
- Place seams where they will be hidden, for example under the arm, behind the neck, or along the edge of clothing. This makes any minor seams in your texture much less noticeable.
- Scale UV islands (the flat pieces of your unwrapped model) based on how much detail they need. The face, for example, needs more texture space than the back of the torso, because the face has more fine detail that needs to stay sharp.
- Avoid stretching as much as possible. Most 3D software has tools to check for stretching, so you can fix any areas where the texture will be blurry.
Modern software like Blender has automatic UV unwrapping tools that work well for beginners, but it’s still worth taking the time to adjust seams and scale manually to get the best result. For production work, manual UV unwrapping is still the industry standard.
Texturing: Adding Color and Surface Detail
Once your UVs are done, it’s time to add textures. Most modern workflows use PBR (physically based rendering) texturing, which creates realistic materials that react correctly to light in any game engine or render engine. PBR uses multiple maps to define different aspects of the material: a base color map for the main color, a roughness map to define how rough or shiny a surface is, a metallic map to define what parts are metal, and a normal map to add fine surface detail from your high-poly sculpt.
For beginners, the easiest way to start texturing is with software like Substance 3D Painter or Blender’s built-in texture painting tools. These programs come with pre-made smart materials that you can adjust to get the look you want, instead of painting every detail from scratch. For example, you can use a leather smart material for your character’s boots, adjust the color and roughness, and add a scratch stamp to add wear and tear.
Don’t forget to add small, realistic details that make your character feel lived-in: scuffs on shoes, faded spots on clothing, a slight redness around the eyes, or freckles across the nose. These small details add personality and make your character feel more real, even if they’re subtle. Reference is just as important for texturing as it is for modeling—if you’re texturing a cotton shirt, look at photos of real cotton shirts to see how the color varies, where the folds are darker, and how light reflects off the fabric.
Rigging and Testing: Preparing Your Character for Use
Once your model and textures are done, if you plan to animate or pose your character, you need to add a rig. A rig is a digital skeleton that you place inside your 3D model, with controls that let you move the character into different poses or animate full movements. Even if you don’t plan to animate a full walk cycle, rigging lets you test how your model deforms and pose your character for a final render.
Basic Rigging Workflow for Beginners
Rigging can be complex, but for beginners, you don’t need to master advanced facial rigging on your first character. Follow this basic process to get a working rig:
- Add a digital skeleton with bones for each major body part: spine, head, arms, legs, and fingers. Position the bones inside your model so they match the anatomy.
- Weight paint your model, which defines how each part of the model moves when a bone moves. For example, when you move the upper arm bone, the shoulder should move with it, not stay in place. Weight painting is the process of painting how much influence each bone has over each part of the model.
- Add control handles for the rig so you can easily move the character into different poses.
- Test the rig by moving the major joints through their full range of motion: bend the elbow, rotate the shoulder, flex the knee, and turn the head. Watch for weird deformations, lumps, or stretching in the model.
If you spot deformations when you test the rig, that means you need to go back and adjust your weight painting or fix your topology. It’s normal to have to tweak a few areas to get smooth deformations—even experienced riggers don’t get it perfect on the first try. If you’re using Blender, there are automatic rigging tools like Auto-Rig Pro that can generate a basic rig for you in a few minutes, which is great for beginners who just want to test their model.
Final Polishing and Rendering
Once your rig is tested and working, you can do a final polish before you render your character. Check for any small mistakes you missed: a flipped normal that makes part of the model invisible, a stretched texture, or a loose edge that needs to be fixed. Set up lighting in your scene to show off your character’s features: three-point lighting is a standard setup that creates depth and highlights the shape of your character. Add a simple background that doesn’t distract from the character, and adjust your render settings to get a high-quality final image.
Conclusion
Learning to model a 3D character is a process that takes time and practice, but breaking it down into clear stages makes it much less overwhelming. Start with pre-production and planning to avoid wasted work, nail your proportions in the blocking stage, focus on clean topology that works for your character’s purpose, and add the details and textures that bring your character’s personality to life. Every 3D artist—even the ones working at major studios—makes mistakes on their first few characters. The key is to finish each model, learn from the mistakes you made, and apply that knowledge to the next one. Whether you want to work in games, film, or 3D printing, a solid foundation in character modeling will open up endless creative possibilities. Start with a simple character, follow the steps in this guide, and you’ll have a finished 3D character you can be proud of before you know it.